How to edit DNS zone in cPanel
- Base De Connaissances /
- Revendeur WHM/Cpanel /
- How to edit DNS zone in cPanel
How to edit DNS zone in cPanel
In order to edit the DNS zone of the domain in your cPanel account, do the following:
1. Log into your cPanel.
2. Navigate to the Domains section and click on the Advanced Zone Editor option: 
3. Choose the domain you would like to edit from the drop-down menu: 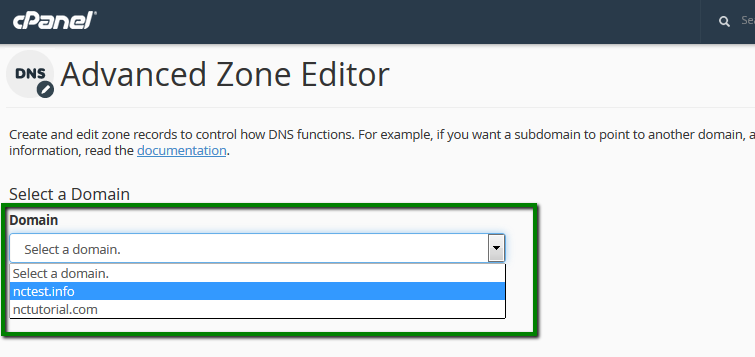
4. If you would like to add a new record, navigate to Add a Record:
A record
Choose A in the drop-down menu next to the Type field.
An A record (Address Record) points a domain or subdomain to an IP address.
- Name: must be a domain with an optional period at the end.
- TTL: must be a positive integer (in seconds).
- Address: must be an IP address.
Once all the fields are filled in, click on the Add Record button: 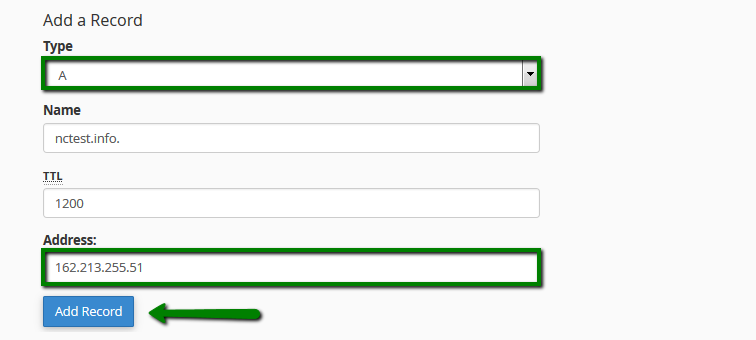
AAAA record
Choose AAAA in the drop-down menu next to the Type field.
AAAA record, also known as 'IPv6 address record', maps a hostname to a 128-bit IPv6 address in the Domain Name System (DNS).
Such an option exists in our Advanced DNS zone editor menu, but full IPv6 support has not been implemented yet: 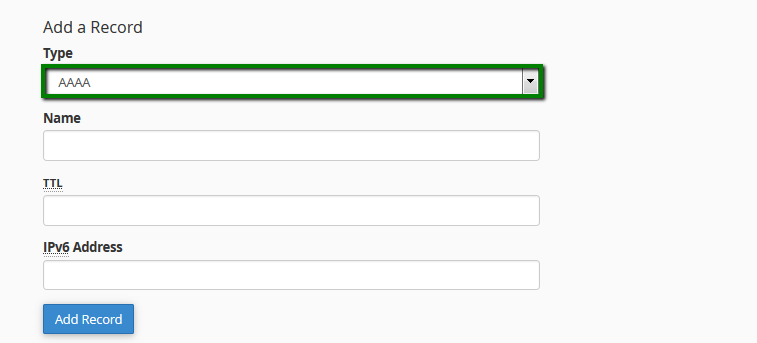
CNAME record
Choose CNAME in the drop-down menu next to the Type field.
CNAME (Canonical Name) points one domain or subdomain to another domain name, allowing you to update one A Record each time you make a change, regardless of how many Host Records need to resolve to that IP address.
- Name: must be a domain with an optional period at the end
- TTL: must be a positive integer (in seconds)
- CNAME: must be a valid zone name
Once all the fields are filled in, click on the Add Record button: 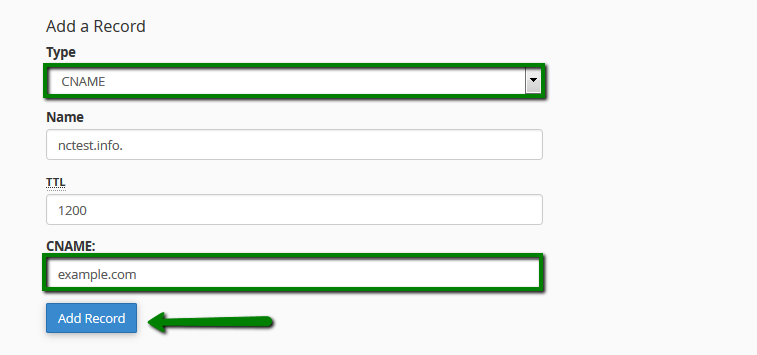
SRV record
Choose SRV in the drop-down menu next to the Type field.
An SRV record points one domain to another domain name using a specific destination port.
- Name: includes the service (the symbolic name of the desired service) and protocol (the Protocol used by the service, usually either TCP or UDP)
- TTL: must be a positive integer (in seconds)
- Priority: priority of the target host, lower value means more preferred
- Weight: relative weight for records with the same priority, a higher value means a more preferred one
- Port: TCP or UDP port on which the service is to be found
- Target: canonical hostname of the machine providing the service, ending in a dot
Example:
Name:_autodiscover._tcp.yourdomain.com SRV TTL: 1200 Priority: 0 Weight: 0 Port: 443 Target: privateemail.com 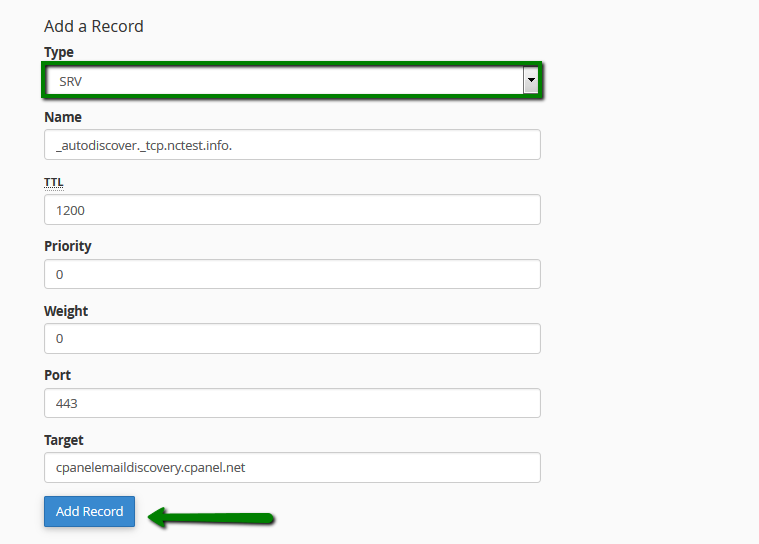
TXT record
Choose TXT in the drop-down menu next to the Type field.
These records hold a free text form of any type. A fully qualified domain may have many TXT records. The most common uses for TXT records are Sender Policy Framework (SPF), DomainKeys (DK), DomainKeys IdentifiedE-mail (DKIM). TXT records historically have also been used to contain human readable information about a server, network, data center and other accounting information.
- Name: must be a domain with an optional period at the end
- TTL: must be a positive integer (in seconds)
- TXT Data: cannot be empty or more than 255 characters.
Example:
yourdomain.com TXT “v=spf1 +a +mx +ip4:198.187.31.8 ?all”
Once all the fields are filled in, click on the Add Record button: 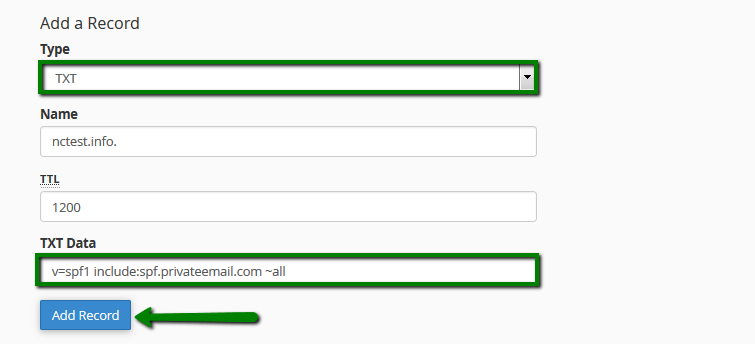
In order to edit the existing records, choose the record that you want to edit from the list of existing DNS records. Click on Edit, then enter values that you need and click on Edit Record to save changes: 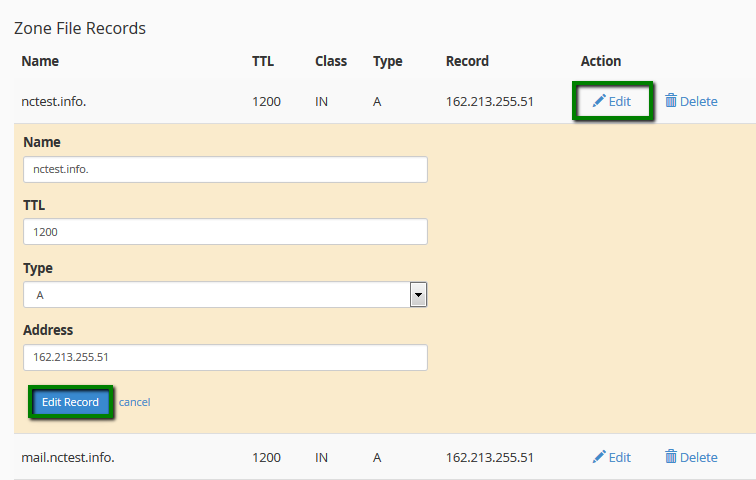
Also, it is possible to reset the DNS zone for your domain to a default one. In this case, the system will erase any modifications you have made to your zone records in this interface or in the Simple DNS zone editor interface. Before you reset your zone file, make sure that you write down any changes that you wish to save.
In order to reset a zone file, select a domain in the drop-down menu, check the corresponding box to confirm you wish to reset the DNS zone for this domain and click Reset Zone File: 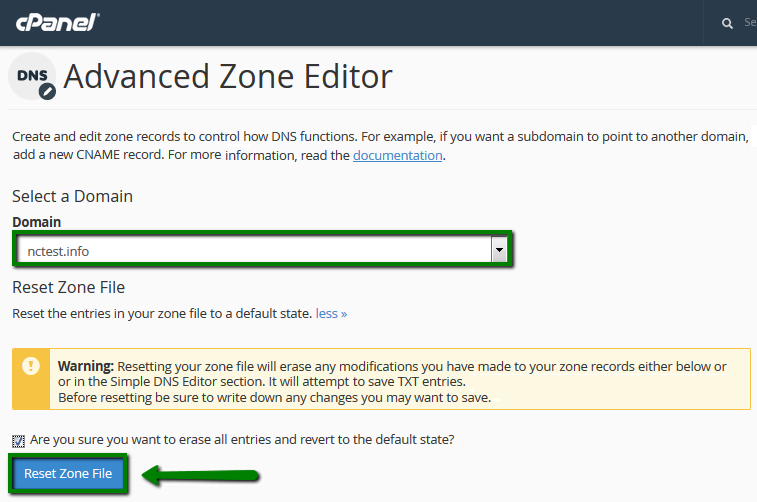
Ouvrir un ticket
Soumettez une demande d'assistance

